
Help ! Advice needed.
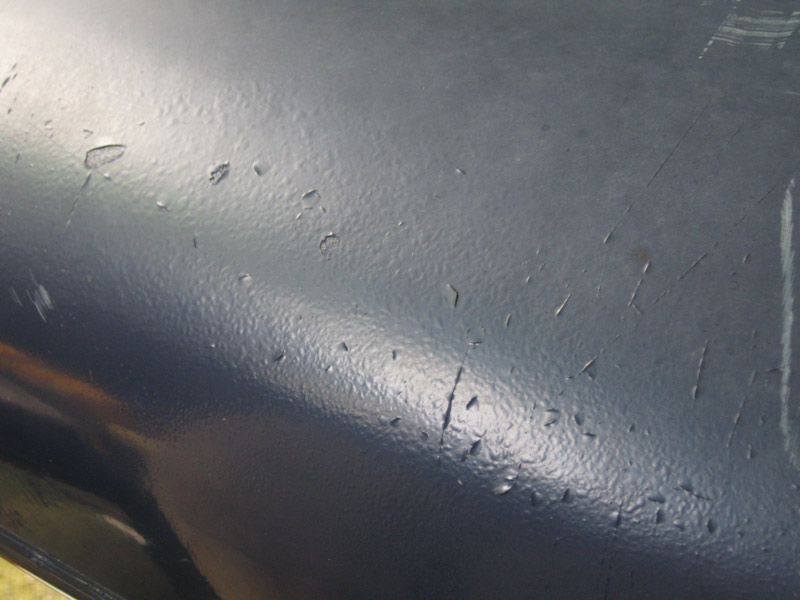
The gel-coat of my Fenn XT has aged strangely : It looks like it has been cutt with a very sharp blade (can be seen on the pics). In some other places, it looks like "orange skin" (does not show well on pics).
If I'm not mistaken gel-coat is polyester resin.
The surfski is made of carbon, so that means epoxy resin.
What would you do to fix it ?
| Attachment | Size |
|---|---|
| gel-coat-1.jpg | 126.29 KB |
| gel-coat-2.jpg | 85.53 KB |
Submitted by Hiro C. on Sat, 01/08/2011 - 4:31pm
Hello Hiro
hope this helps, found this on you tube.
#1 Sat, 01/08/2011 - 6:31pm
I sense a mini sex bomb in the near future.
#2 Sat, 01/08/2011 - 6:39pm
@ mulus : Thanks, basicaly that's what I intend to do. But since I don't know why the gel coat turned that way I'd like to know if I must take it all away or not. Also, will the polyester gel-coat adhere to the epoxy underneath ? if not what can I do ? Is there some kind of epoxy gel-coat ? Must I sand everything and paint ?
@ jeremy : My wife will paddle this ski, so she'll decide the color scheme... Maybe I can convince her that a pink camo will look great !
#3 Sat, 01/08/2011 - 7:46pm
Hello Hiro ,I made a comment on surfski.info about your Xt
as to the video there are afew things i see
1)acetone may remove the printing off those stickers so either tape them off or remove them first thing you do
2) you can put wax into the gelcoat which makes is a flowcoat ( the additive is often called Wax in Styrene )then you do not have to cover it at all
3) If you are happy to cover it there is a fabric called "peel ply" that conforms MUCH better than the wax paper shown.It is often sold by fabric companies in Australia as polysheen and used in the lining of suits ,This allows you to use regular unwaxed gelcoat
4) another way to use unwaxed geloat is to spray a layer of PVA over the gelcoat repair to keep air off it as it cures ,this will stop it from being sticky when it is hard.
#4 Sun, 01/09/2011 - 3:57am
Ugh, As soon as I saw two hands I knew that video was gonna be a total hack job ...
And it was ... painful to watch ... from the erratic sanding to the attempt to lay wax paper ( not needed ) over the 3D corner with not masking @ repair perimeter. Notice the sticker is totally gone ?
Here is some real world instructions ...
http://www.surfskiracing.com/Technique/Gelcoat_Scratch_Repair.html
Hiro, how old is that boat ?
The orange peel stuff is a repair / sprayed after boat out of mold and it looks like it never cured + was applyed over an improperly prepped surface ... Sorry.
Whatever you do ... Don't expect anything applied over it to work nice for long ... You gotta take that stuff off first.
aloha,
pog
#5 Sun, 01/09/2011 - 9:12am
Hiro; gelcoat over an epoxy/carbon laminate is a cheap trick.............gelcoat is formulated to cure by exothermic reaction, which means that it needs to be applied thickly to cure properly, and the epoxy to polyester bond is not very good to start with.
What is the point of a thin lightweight laminate with a thick (and heavy) non structural surface coating ?? Better to have a thinner coating of paint which is formulated to bond well to the substrate.
Prepping the surface for painting is going to be the difficult part because you have a paper thin outer carbon laminate, which must be sanded in order to key the paint primer, without removing much of the laminate it'self.
#6 Sun, 01/09/2011 - 11:10am
@ onno and goodwaka : thanks for answers and advices.
Don't be afraid : I believe in tape masking around repair areas !
I think will scrape/peel/sand everything that can be with a very sharp blade (caution) and use some epoxy filler.
#7 Sun, 01/09/2011 - 11:53am
Yep! scraping with the adge of a very sharp blade is the best way to remove anything that is peeling or not well bonded. Dry sanding after this with 220 grit will key the surface for paint priming, then start with wet sanding 400 grit before finish coating.
#8 Sun, 01/09/2011 - 1:20pm
Hiro, the best scraper is not necessarily a very sharp blade. A burred edge is what the old Pros use in a dragging motion which is less likely to gouge. Info on how to easily make one here http://en.wikipedia.org/wiki/Card_scraper.
There are heaps of other sites that explain scrapers if you Google.
I made mine from an old steel band saw blade (not hacksaw) so it will conform to the hull as i scrape, almost impossible to gouge this way.
R
#9 Sun, 01/09/2011 - 5:09pm
Hiro
Do you know how that last finish was applied? It looks like it was done by a roller with out a Primer. maybe you can use paint remover or heat gun. not sure what a heat gun would do to epoxy. As for the finish Ive used a good Dura guard paint and it works fine. Or if you know someone that does auto body paint it would even look better. I remember being told once you can put epoxy on polyester but not the other way.
Sorry Onno, about the low quality of the vidieo I posted it was somthing I came across on the you tube.will try to raise the standard.
happy canoe year
#10 Sun, 01/09/2011 - 5:38pm
I started to work on it and the more I sanded, the more it became obvious the whole gel-coat must be taken away : small cracks an pinholes everywhere ! (see pics 3 & 4)
So I took my sander (see pic 5).
When the sanding'sover, I think I'll have to glass the hull (with epoxy resin) before I paint it. Do I have to fill holes before I glass or after ? Or maybe it doesn't matter ?
Do I really need to glass the hull or an epoxy primer is OK ? Like the one you use on boats before you paint with antifouling.
The ski is 19' long, 20" wide. How much resin is needed for glassing ? How much paint for 1 coat ?
I won't find those products at the hardware store in Huahine (where I live) and I'll have to order them from a shop in Tahiti so I need to know how much is enough...
And I tought that was a 2 hours job ! ;-)
#11 Sun, 01/09/2011 - 9:22pm
Hello Hiro
this is how its done in a shed. For the dipps they have different thickeners for epoxy like balloons or microballoones that you could make a paste from ( like peanut butter) any little imperfections you leave will come through the paint. you could use bondo but its very heavy. you wont need that much 1/2 a quart. you should be able to get them in a couple of passes maybe three. a quart of primer could maybe do it. you wont be sorry if you use the better primer. a gallon of paint would be more than enough, first coat then the next day wet sand (200 grit) and another coat. and repeat as desired. if you roll it on defiantly do a wet sand finish you would make it look great start at 200 grit all the way up to 2000 grit. too get that shinny finish.
#12 Mon, 01/10/2011 - 7:07am
Hi Hiro,
Nice job !!! Now keep going !!
What grit are you using ? Use as fine a grit as you can ( that still works : ) and DON'T TOUCH anything.
DO NOT wipe it with anything either. You are creating a near perfect surface to cover / finish.
I would not worry too much about those little voids ... but the crazing in the first pic has me wondering ... You really gotta take all that stuff off. Sorry.
Do you have access to spray equipment ?
aloha,
pog
#13 Mon, 01/10/2011 - 7:57am
I've sanded that fù%!"g gel-coat, with 150 and 220 grit... took me a loooong time !
Applied some epoxy filler where needed (pic 7) and sanded again...
BTW I decided to make it look "seamless". I've always tought the seam between the hull and deck was ugly.
Painted the hull with primer (pic 8).
unfortunately onno, I don't have acces to a spray gun...
Before I contact the builder, pleas look at pic 6, and tell me what you think. This is how the gel-cot came when I sanded. Is it normal that the color is lighter under or does it shows that the hull has been re-coated or painted after getting off the mould ?
#14 Thu, 01/13/2011 - 7:31pm
Looking great. not sure what that is under there. can wait to see the finished product.
#15 Thu, 01/13/2011 - 8:53pm
Hiro,
Already knew it was resprayed.
What are you using for primer ?
Not sure how you want the finish to be when done but the hard work is behind you now ... Take your time on the primer and let it get nice and hard between coats. Use that filler and avoid the temptation to used the primer as fill.
aloha,
pog
#16 Thu, 01/13/2011 - 10:08pm
fill...sand...coat...sand...
I have no more fingerprints !
@ onno : added a pic of what I'm using : not much choice here.
#17 Fri, 01/14/2011 - 7:00pm
A great vidio find. Hopfully this one is better.
But I do like how they wet sand and buff. and get that shine
#18 Fri, 01/14/2011 - 10:45pm
Hiro,
The gelcoat one shows a hull .. You are not applying gelcoat over the primer are you ???
I remember the sales rep handing me a can of that Brightside stuff to try out ... If you ever run out, ( an have a choice : ) switch to the Z-spar equivelent version .... It flows out nicer and lasts longer gloss wise.
aloha,
pog
#19 Sat, 01/15/2011 - 9:33am
Nice job Hiro!.................waiting for Rambo to chip in now and contradict me........whatever!
Different colour beneath the gelcoat is probably a bondcoat that is sprayed onto the gel while in the female mold.
This is the "cheap trick" to get the epoxy laminate to stick to gelcoat and save on all the prep time in sanding, priming and painting. It also means that a lamination over the seamline is missing, or else bonded onto the weaker epoxy to polyester bond surface.
#20 Sat, 01/15/2011 - 9:58am
@ onno : No more gelcoat on this boat... I just keep on naming the pics after the first one... No Z-spar here nor any other brand.
@ goodwaka : Yep ! No lamination found over the seamline.
Pic shows first coat of paint, done yesterday. This morning, I'll sand and paint again.
Having to wait for the filler/primer/paint to dry sa you can continue to work is very frustrating... and I'm lucky cause temp here is over 30°C (over 86°F) anddrying times are shorts.
#21 Sun, 01/16/2011 - 8:06am
Heaqt is good for paint drying..............and also for deforming badly cured epoxy laminate - I'm just guessing that the grey hull hanging in background of your last pic is epoxy ?... no! ...or maybe undercured polyester?
#22 Sun, 01/16/2011 - 1:08pm
The top hull in the las pic is another ski in a cloth cover.
The lower (small) one is a short hull made from a broken va'a. I assembled the bow and aft parts of the hull, cutting away the cockpit that was badly damaged. The idea is to make a small ski or vaa for a kid. The gray on this hull is what was left from the primer in the paint tray : I didn't wanted to throw it away or put it back in the can...
#23 Sun, 01/16/2011 - 1:23pm
Looking good Hiro
#24 Sun, 01/16/2011 - 10:57pm
"The top hull in the last pic is another ski in a cloth cover"
OK! makes sense now...... Although I have had epoxy parts warp badly in a paint oven, nothing as bad as that pic is likely.
About the cut-down va a, to make a kid size craft -- good one ! ....the earlier they start the better. I managed to get my first boy paddling his own little kayak at about 3 years old.
#25 Mon, 01/17/2011 - 12:50pm
Hiro,
I'd love to see the progress you've made. I'm just about to start to primer my boat. I'm assuming you've finished up your project
#26 Sat, 02/05/2011 - 4:56pm
yep ! back into the water...
#27 Sun, 02/06/2011 - 10:21am
Always thought the footstraps were too lose, I took the time to shorten them.
#28 Sun, 02/06/2011 - 11:05am
Glued a bungie loop (from huki online store). The deck is "cleaner" now : no more bungies running over the hatch opening.
Last pic was its first time back in the sea, took it for an hour paddle and it didn't take any water.
#29 Sun, 02/06/2011 - 11:10am
looks killer, although i have to admit i was hoping for the Sex Bomb paint scheme.
#30 Sun, 02/06/2011 - 11:31am
Dam Hiro, gorgeous. wish I could drop by for a try. its boarder line snow up here. great job
#31 Sun, 02/06/2011 - 12:15pm
thanks, Now i just have to wait to see how it will age...
@jc : if only I had (and knew how to use) a spray gun and a compressor...
@mulus : in my country cold water is 27°C (81°F) water.
#32 Sun, 02/06/2011 - 2:07pm
No editing of the video, sorry for th sound.
Just bought an Olympus µ Tough 3000. Supposed to be waterproof up to 10 feet. That should be okay for filming on a canoe. Only problem is that vids format is MP4, and that Windows movie Maker does not read them, so I can't edit. Do you know a freeware that would do the trick ?
#33 Sun, 02/06/2011 - 6:43pm
Hi Hiro
I use VideoLAN for doing audio/video viewing and converting. Give it a go from videolan.org
#34 Sun, 02/06/2011 - 10:32pm
Thanks, I'll try.
I found a freware : Free Video Converter. With this I converted my vids in a format that WMM can read and edit.
#35 Mon, 02/07/2011 - 6:57am